In this four part series of blogs, CES academic Dr Jonathan Chenoweth explores the trials and tribulations of bringing a 19th century terraced house up to a modern standard of insulation and comfort.
The first blog covers planning of the project.
Part 2: Insulating the walls
Given how our house was built, we were stuck with only one option for insulating the walls of the house – internal wall insulation. Each of the external facing walls was to be lined with insulation boards and then plaster board. We would lose about 8 cm of floor space along each wall being insulated. The better the insulation used, however, the less space lost.
Natural materials like sheep’s wool or shredded paper sound great, but compared to polyurethane boards, they are not as effective, so we would have needed a much thicker amount of insulation to get the same effect. Insulation effectiveness is measured in R-values and U-values. U-values measure the heat lost through a given thickness of a material, while R-values measure the resistance of something. For U-values, the lower the value the better the insulation. (A U-value is the number of watts of lost per square meter of wall per degree of temperature difference between the inside and outside.) Polyurethane boards have a thermal conductivity as low as 0.020 W/mK. For sheep’s wool the value is about 0.040 W/mK so you need twice the thickness to get the same level of thermal resistance, and there is the risk of insects eating their way through all your insulation over time. The best available insulation currently is vacuum insulation panels, having a conductivity value of 0.007 W/mK, however, the insulation completely loses its effectiveness if the vacuum is lost, so if in ten years’ time someone bangs a nail into the wall to hang a picture, the insulation panel behind the plaster might become useless. Aerogel is the next best but was way too expensive for us and would only have saved us a few centimetres of insulation thickness, so wasn’t worth it. We decided to go with Celotex PL 4065 65mm boards for the walls – 65mm of PIR insulation with a conductivity value of 0.021 and 12.5mm plaster board. The PIR boards are faced with aluminium foil forming two reflective moisture barriers – an important feature for us given how damp our solid brick walls are. For comparison, bricks have a conductivity value of about 0.600, so loses heat about 30 times as fast as polyurethane.
Before we could do any insulation work we had to put in a building works application to the city council. Under UK building regulations, Part L (Conservation of fuel and power), where you are replastering more than 50% of a solid wall, you essentially have to meet current insulation standards. The solid brick walls of our house had a u-value of about 2.0. Under the building regulations if we wanted to improve the insulation then we had to get the u-value down to below 0.30. Using an online calculator (http://www.thermalcalconline.com/u-value-calculator/u-value-opaque/u-value-opaque.html), I prepared and submitted to the local authority a building works application, clearly documenting what thickness of materials, etc., we would use to meet the building regulations. For the walls I submitted the following calculations:
Celotex PL 4065 65mm board producing the following thermal characteristics:
-Plaster board: 0.06 m2K/W
-Celotex PL4065 board: 2.95 m2K/W
-Air layer with wooden studs for attaching the insulation boards: 0.17 m2K/W
-Solid brickwork 280mm: 0.36 m2K/W
Total thermal resistance: 3.72 m2K/W
Total U-Value: 0.27 W/m2K
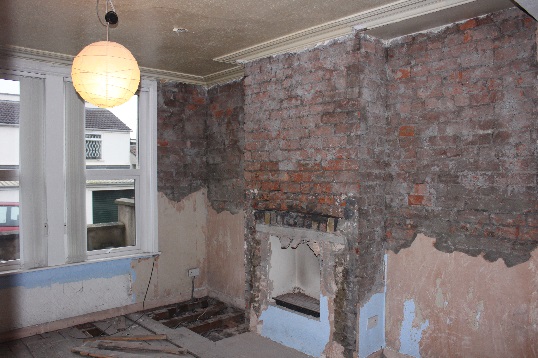
The living room after we had stripped down the walls ready for the insulation. You can see the water proof render up to about waist height on walls.
Our solid brick walls were faced with about two centimetres of rough plaster, half a centimetre of finishing plaster, textured wall paper and then a lot of paint (and mould). We stripped everything down to the brick work, except where a previous owner had put waterproof render on part of the walls to try to deal with the damp problems. (This just transferred the damp higher up the walls, causing the lintels above some of the windows to rot – these we had to get a builder in to replace.) We also removed a disused chimney breast from the loft down to the ground to make the rooms a little bigger and compensate for the lost space from all the insulation.
We were very glad of having a large garage when the insulation panels arrived. The boards were 120 by 240 cm in size, and together with the insulations boards we bought for under the floor and the loft, we ended up with two stacks of panels each two and a half metres high. Seeing that I made me realise the scale of the project we were undertaking.
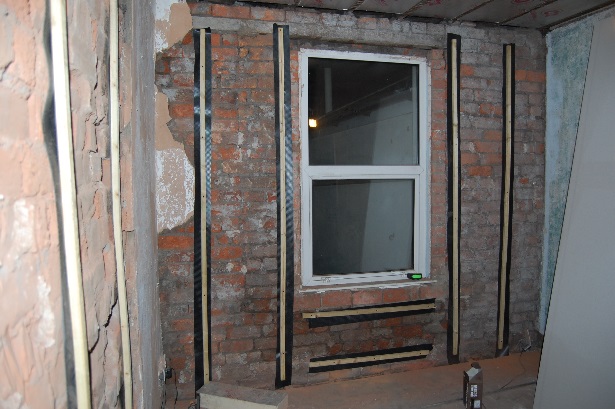
An upstairs bedroom with the water proof membrane strips and wooden battens stuck to the wall ready for the insulation panels to be screwed in.
The Celotex boards we used can either be glued to the brick work if the underlying wall is sound and even, or attached to wooden battens screwed to the wall. We decided to go with 18mm treated wood battens (screwed on top of a black water proof membrane so they wouldn’t eventually rot) so we could maintain an air gap between the brick wall and the insulation panels to allow moisture in the wall to escape either to loft space or under the floor. The finished boards were later given a coat of plaster by a plasterer to get a perfect finish.
Part 1 – Planning the Eco-Renovation
Part 4 – Insulating the ceiling & installing a Mechanical Heat Recovery Ventilation System