In this four part series of blogs, CES academic Dr Jonathan Chenoweth explores the trials and tribulations of bringing a 19th century terraced house up to a modern standard of insulation and comfort.
The first blog covers planning of the project, the second explores insulating the walls and the third looks at the floors.
Part 4: Insulating the ceiling and installing a Mechanical Heat Recovery Ventilations System
When we bought the house we found some insulation in the loft space. It was old and a bit patchy – in some places there as a single thickness of about 10cm and in other places a second layer on top of another 10cm. The loft space was not huge and we wanted to both significantly improve the level of insulation while also making the space much more useful for storage. Since we were planning on replacing the plaster ceilings throughout the house in order to get rid of the damaged textured plasterwork, the loft space would be temporarily open fully from the bed rooms below.
We decided to put in solid board insulation like we had installed under the floor and on the walls of the house. Compared to rock wool, these PIR boards were roughly twice as effective at insulation so we would need only half the thickness, thus leaving us more useful space.
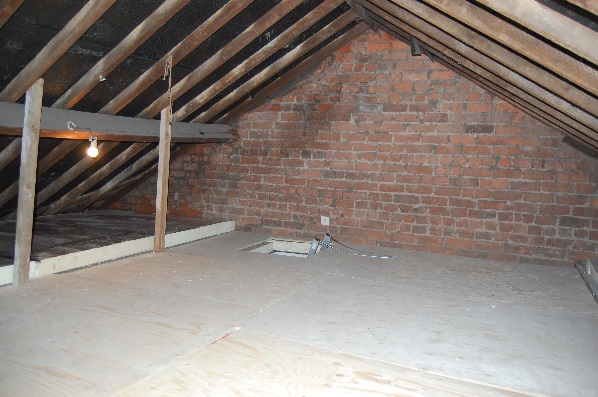
The loft once the two or three layers of PIR board insulation were installed and then the marine ply boards laid over the top so we could walk anywhere without causing damage.
We decided to go for 70mm thick Celotex PIR boards placed between the ceiling joists and then lay across the joists another layer of 100mm thick Celotex PIR boards. On the sides of the loft where head height was low due to the roof line, we decided to lay some leftover Celotex boards from the floor. So for roughly half the ceiling area, we laid the 110mm Celotex boards on top of the previous ones to produce an insulation layer 280mm thick – the equivalent of having about 550mm of rock wool and a U-value of 0.08 W/m2K. (This was going to be one very snug house.) So we could walk around freely and not ever risk damage to the insulation boards, we decided to lay 18mm marine ply boards over the central area of the loft space where the Celotex was only 170mm thick. Because we didn’t replace the ceiling joists to make them able to support a heavy load, although we could walk anywhere in the loft, only on the central spine of the roof where the joists were resting on a supporting brick wall could we store heavy items. (Once we moved in this central spine was soon stacked with boxes all the way to the tiles – where does all the stuff come from?).

Along with insulating the loft extensively, we also insulated the loft hatch, otherwise we would have massively reduced the effectiveness of all the loft insulation as the heat would escape from the house via this uninsulated bit.
During our first winter in the house we found that we were getting very bad condensation on the windows. These we hadn’t replaced since they were double glazed and in reasonable condition. The condensation was so bad that puddles of water were building up on the window sill and then overflowing down onto the power points below each night. The air in the bedrooms also felt rather stuffy during the night.
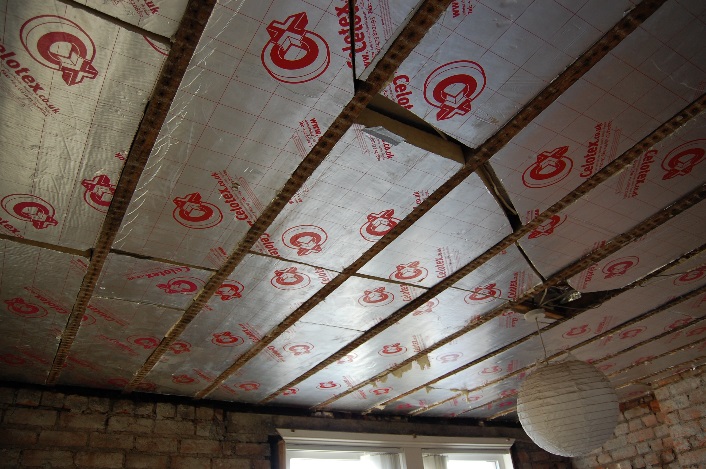
Looking up at the loft insulation from the bedroom below, showing the Celotex boards wedged between the ceiling joists. In order to avoid any risk of wires overheating, the wires to the light are cut into the insulation so that they rest on the plaster, not between insulation layers, so heat can escape.
Our problems with air quality and condensation were due to the insulation work we had done, which despite my pessimism that it would be possible, had actually made the house rather air tight. With all the insulation, the walls, floors and ceilings were now losing little heat and were warm, so the windows were by far the coldest part of each room. The warm moist air in the house was hitting the cold windows and then the moisture was condensing out in puddles. We could obviously just open a window to ensure more air flow, but this would kind of defeat the purpose of insulating the house in the first place.
The solution to the condensation problem was to install a mechanical heat recovery ventilation system. These systems suck air out of the house and use the heat in this air to heat the fresh air being pumped in from outside. An efficient system can capture about 90% of the heat from the air being removed, while a less efficient system will capture only about 65% of the heat. A good system will have a summer bypass mode, so that in summer you can blow fresh air into the house without having it heated by the air going out, so you can cool house when it is cooler outside. However, an efficient system with a summer bypass mode can easily cost a couple of thousand pounds, plus installation costs. Fortunately, I found such a system on Ebay for a quarter of this cost from a builder who had an unused system he was selling. With the cost of buying the insulated ducting, vents, wiring, and other bits and pieces the whole installation cost me less than £1000.
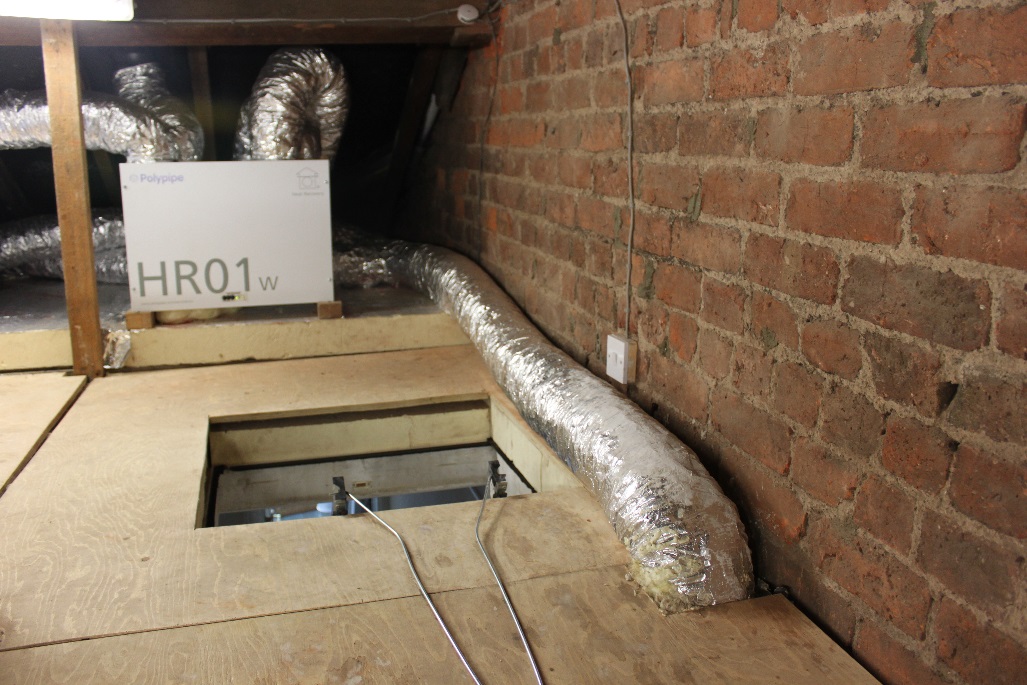
The mechanical heat recovery ventilation system. It is nicely tucked away in the loft, with the ventilation ducts running along the sides of the loft so most of the loft is still available for storage.
The challenge with installing the mechanical ventilation system was how to run the ventilation pipes, which with insulation would be 20cm thick, so that all the rooms of the house would be connected. The solution was to put the system in the loft, running the ventilation pipes to the upstairs rooms in the loft space, and then using the airing cupboard in the bathroom as the space to run the ventilation pipes down to the kitchen on the ground floor. Unfortunately, the living room would still not be connected, however, as a large room it didn’t seem to suffer from condensation like all the others. In the bathroom I decided to connect up a humidity switch, so that whenever the humidity level got too high, the ventilation system would go into boost mode for twenty minutes. We also needed to connect up the unit to a drain so it could dispose of the condensation water it would produce. Fortunately, as we had moved the washing machine to the airing cupboard to save space in the kitchen, we could plumb it in to the washing machine drain, and burry the drainage pipe in the insulation in the loft so it would not freeze in the middle of winter and then flood the room below. (28cm of insulation comes in handy for more than just keeping the heat in in the room below.)
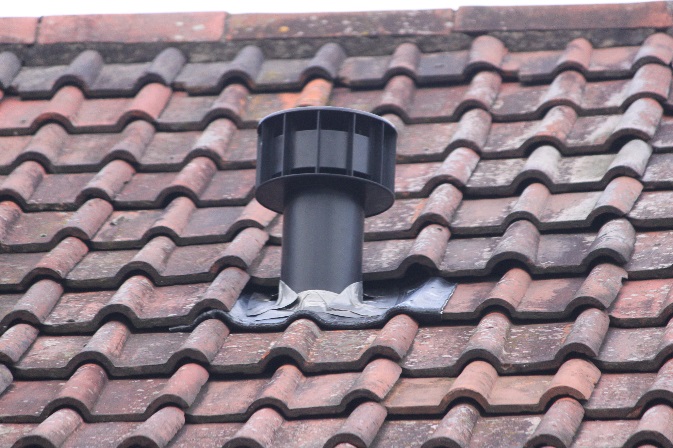
One of the two vents from the mechanical heat recovery ventilation system on the roof. The two vents are widely spaced apart so none of the air pumped from house is sucked back in.
Installing the ventilation system took a full couple of weekends. Once installed, it made a huge difference. While there was still a little condensation on the windows in the morning, the amount was insignificant. If the house is 20 degrees and outside it is 0 degrees, the air from outside being blown into the house is about 17 degrees. The system is very cheap to run and left on continuously – in normal mode it uses less than 10 watts of power, while in boost mode, about 40 watts. While sitting next to it in the loft, you cannot hear if it is on when in normal mode; in boost mode you can just hear it in the hallway below. Never does it feel stuffy in any room.
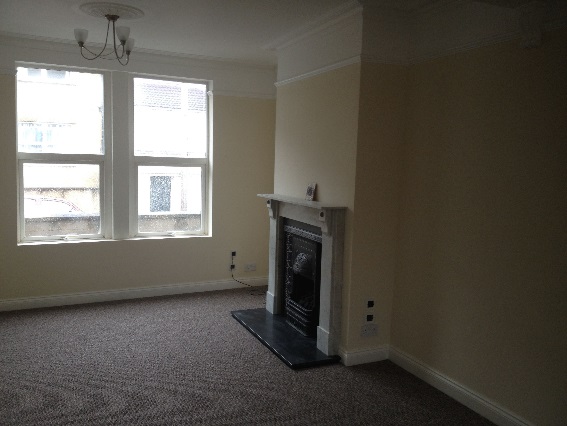
The finished living room, just before we moved in. We installed a salvaged marble fire place fitted with an efficient gas burner which looks Victorian. We also installed Victorian style cornices, picture rails and ceiling roses so that the house would look like an authentic Victorian house.
Was the house renovation project worth it? Well, the whole project cost about £30,000 – for a modest sized terrace house of two bedrooms and 85 square metres. On the basis of energy savings alone, the works will take decades to pay for themselves. However, much of the works were undertaken not for energy saving reasons but to make the house more liveable. Living in a cold damp house that is falling down around you is not good but living in a house that stays permanently warm in winter with hardly any need for heating is great. It is a great compromise between the comfort and ease of living in a new house and having the character of an old house. Even with the £30,000 renovation cost, we paid considerably less in total than if we had bought a similar sized new house in the same area. By doing most of the work ourselves we saved money, learnt the practicalities of eco-renovation and now it really feels like our home.
Part 1 – Planning the Eco-Renovation